Hey there. If you ever come to a point where you want to do your own thing and not use other’s Burp Collaborator, I believe that this guide will help you!
I also believe that if you are here, unless you randomly saw this post on the socials, you are probably having a bad time setting everything up. In my case, I found that the official documentation was not that helpfull and for that reason decided to create this post.
What is this about?
This is a step-by-step guide on how to configure Burp Collaborator Server on a VPS, using wildcard SSL certificates. This will also show you how to configure a DNS server to use a custom sub-domain for this purpose.
Burp Collaborator is an external service that Burp can use to help discover many kinds of vulnerabilities. For example:
- Some vulnerabilities arise when an application interacts with external systems, based on supplied input. For instance, out-of-band XSS can arise when an application fetches content from a URL specified in a request parameter, and returns that content unsanitized in its own response.
- Some injection-based vulnerabilities can be detected using payloads that trigger an interaction with an external system when successful injection occurs. For example, some blind SQL injection vulnerabilities cannot be made to cause any difference in the content or timing of the application’s responses, but they can be detected using payloads that cause an external interaction when injected into a SQL query.
- Some service-specific vulnerabilities can be detected by submitting payloads targeting those services to the target application, and analyzing the details of the resulting interactions with a collaborating instance of that service. For instance, mail header injection can be detected in this way.
Prerequesites
- A VPS(??). I bought one here.
- A domain name.
- LetsEncrypt.
- Burp Suite Pro.
The environment
Setting up your VPS
Okay first lets install java. The easiest option for installing Java is using the version packaged with Debian. Specifically, this will install OpenJDK 8, the latest and recommended version.
First, update the package index.
sudo apt-get updateNext, install Java. Specifically, this command will install the Java Runtime Environment (JRE).
sudo apt-get install default-jreInstall iptables-persistent for some persistency
sudo apt-get install iptables-persistentHaving everything installed, lets create a working directory and upload the burpsuite_pro_<latest_version>.jar to this folder.
sudo mkdir -p /usr/local/collaborator/The next steps will assume you have uploaded burpsuite_pro_<latest_version>.jar to the /usr/local/collaborator/. You don’t actually need to have a Burp License to run Burp Collaborator.
Create a system user to run the server. This will be a very restricted user to avoid running Collaborator as root:
sudo adduser --shell /bin/nologin --no-create-home --system collaboratorChange the owner of the /usr/local/collaborator to be the collaborator user:
sudo chown collaborator /usr/local/collaborator Configure Collaborator
Before moving on, run ifconfig on your system to get your server’s IP address:
root@collaborator:/usr/local/collaborator# ifconfig
ens3: flags=4163<UP,BROADCAST,RUNNING,MULTICAST>  mtu 1500
        inet 54.38.**.**  netmask 255.255.255.255  broadcast 54.38.**.**
        ether aa:bb:cc:dd:ee:ff  txqueuelen 1000  (Ethernet)
        RX packets 1751433  bytes 1655333949 (1.5 GiB)
        RX errors 0  dropped 0  overruns 0  frame 0
        TX packets 1266913  bytes 1302210556 (1.2 GiB)
        TX errors 0  dropped 0 overruns 0  carrier 0  collisions 0
Create a configuration file (nano /usr/local/collaborator/collaborator.config) with the following content (edit the highlighted):
{
  "serverDomain" : "my-subdomain-for-burp.example.com", # edit here
  "workerThreads" : 10,
  "eventCapture": {
      "localAddress" : [ "54.38.**.**" ], # and here
      "publicAddress" : "54.38.**.**", # and here (yeah, same ip..)
      "http": {
         "ports" : 3380
       },
      "https": {
          "ports" : 33443
      },
      "smtp": {
          "ports" : [3325, 33587]
      },
      "smtps": {
          "ports" : 33465
      },
      "ssl": {
          "certificateFiles" : [
              "/usr/local/collaborator/keys/privkey.pem",
              "/usr/local/collaborator/keys/cert.pem",
              "/usr/local/collaborator/keys/fullchain.pem" ]
      }
  },
  "polling" : {
      "localAddress" :  "54.38.**.**", # and here
      "publicAddress" :  "54.38.**.**", # and here
      "http": {
          "port" : 39090
      },
      "https": {
          "port" : 39443
      },
      "ssl": {
          "certificateFiles" : [
              "/usr/local/collaborator/keys/privkey.pem",
              "/usr/local/collaborator/keys/cert.pem",
              "/usr/local/collaborator/keys/fullchain.pem" ]

      }
  },
  "metrics": {
      "path" : "jnaicmez8",
      "addressWhitelist" : ["0.0.0.0/1"]
  },
  "dns": {
      "interfaces" : [{
          "name":"ns1.my-subdomain-for-burp.example.com", # and here
          "localAddress":"54.38.**.**", # and here
          "publicAddress":"54.38.**.**" # and here
      }],
      "ports" : 3353
   },
   "logLevel" : "INFO"
}
Note: All ports were configured to be higher than 1024 so that Burp Collaborator could bind to them without root privileges. We will later fix this with a few iptables.
Setting up wildcard SSL certificates
Since March 2018, Let’s Encrypt released the support for free wildcard SSL certificates (yey!). To install the most recent version of Let’s Encrypt run:
cd /usr/local/collaborator/
wget https://dl.eff.org/certbot-auto
chmod a+x ./certbot-auto
Now, create a bash script to ease the process of moving the certificates to the right place and fix permissions:
sudo nano /usr/local/collaborator/configure_certs.shEdit its content to something similar to the below:
#!/bin/bash

CERTBOT_DOMAIN=$1
if [ -z $1 ];
then
    echo "Missing mandatory argument. "
    echo " - Usage: $0  <domain> "
    exit 1
fi
CERT_PATH=/etc/letsencrypt/live/$CERTBOT_DOMAIN/
mkdir -p /usr/local/collaborator/keys/

if [[ -f $CERT_PATH/privkey.pem && -f $CERT_PATH/fullchain.pem && -f $CERT_PATH/cert.pem ]]; then
        cp $CERT_PATH/privkey.pem /usr/local/collaborator/keys/
        cp $CERT_PATH/fullchain.pem /usr/local/collaborator/keys/
        cp $CERT_PATH/cert.pem /usr/local/collaborator/keys/
        chown -R collaborator /usr/local/collaborator/keys
        echo "Certificates installed successfully"
else
        echo "Unable to find certificates in $CERT_PATH"
fi
Obtain the certificates
Next step is to create the SSL certificates, run:
./certbot-auto certonly -d my-subdomain-for-burp.example.com -d *.my-subdomain-for-burp.example.com --server https://acme-v02.api.letsencrypt.org/directory --manual --agree-tos --no-eff-email --manual-public-ip-logging-ok --preferred-challenges dns-01Follow the guide (it will ask you to insert your email).
After that, you will see the first message on how to deplay a DNS TXT record. Press Enter and let it give you a second message:
-------------------------------------------------------------------------------
Please deploy a DNS TXT record under the name
_acme-challenge.my-subdomain-for-burp.example.com with the following value:

YKoOF0jc6wqZJLUIhF3YQJ8MzyWWfkT3weW24_8hhBU

Before continuing, verify the record is deployed.
-------------------------------------------------------------------------------
Press Enter to Continue (Press enter here, we are expecting two different TXT records)

-------------------------------------------------------------------------------
Please deploy a DNS TXT record under the name
_acme-challenge.my-subdomain-for-burp.example.com with the following value:

s10-sRD0KPJfFujYl5_ql6TEQkwkVppLZLW45ITK-d4

Before continuing, verify the record is deployed.
-------------------------------------------------------------------------------
Press Enter to Continue
Now that you have two different TXT records to setup, go to your DNS server/cloudflare and configure both records (using the same name: “_acme-challenge.my-subdomain-for-burp”).
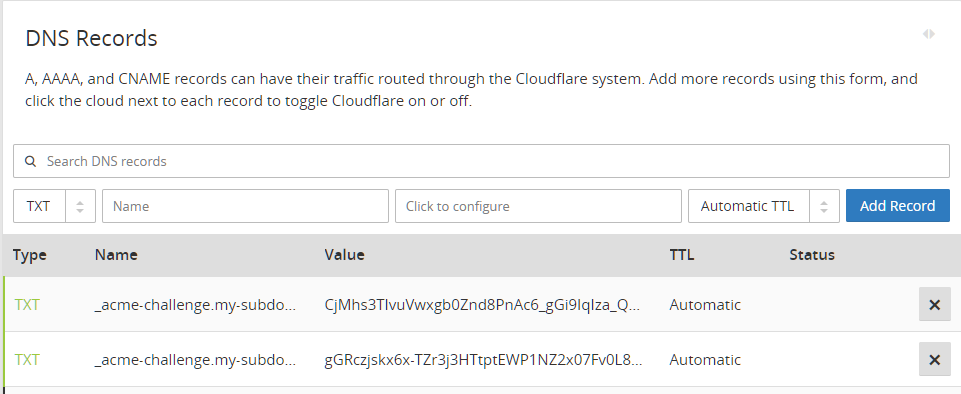
Delegating DNS zone to the VPS
Note: Setting this two records is to prevent setting up a web server and perform HTTP validations.
Now press Enter. You should see the following messages:
Waiting for verification...
Cleaning up challenges

IMPORTANT NOTES:
 - Congratulations! Your certificate and chain have been saved at:
   ...
Great. You now have certificates. To “install them” run:
chmod +x /usr/local/collaborator/configure_certs.sh && /usr/local/collaborator/configure_certs.sh my-subdomain-for-burp.example.comAll done? Check if you are able to run everything without errors:
sudo -H -u collaborator bash -c  "java -Xms10m -Xmx200m -XX:GCTimeRatio=19 -jar /usr/local/collaborator/burpsuite_pro_1.7.33.jar --collaborator-server --collaborator-config=/usr/local/collaborator/collaborator.config"
2018-04-08 19:46:36.082 : Using configuration file /usr/local/collaborator/collaborator.config
2018-04-08 19:46:37.473 : Listening for DNS on 54.38.**.**:3353
2018-04-08 19:46:37.486 : Listening for HTTP on 54.38.**.**:39090
2018-04-08 19:46:37.486 : Listening for SMTP on 54.38.**.**:3325
2018-04-08 19:46:37.487 : Listening for HTTP on 54.38.**.**:3380
2018-04-08 19:46:37.486 : Listening for SMTP on 54.38.**.**:33587
2018-04-08 19:46:37.600 : Listening for SMTPS on 54.38.**.**:33465
2018-04-08 19:46:37.600 : Listening for HTTPS on 54.38.**.**:39443
2018-04-08 19:46:37.602 : Listening for HTTPS on 54.38.**.**:33443
If your output was similar to the above, you are ready to move to the next steps! Right now just press CTRL-C
DNS
Go to your DNS server/cloudflare and create two new records.
NSrecord point tons1.my-subdomain-for-burp.example.comArecord point to54.38.**.**

Delegating DNS zone to the VPS
Setup iptables
Remember to setup Burp Collaborator with high numbered ports (>1024)? Great, now you need to forward the default ports to the ones you configured.
The following commands will do that for you.
iptables -t nat -A PREROUTING -i ens3 -p udp --dport 53 -j REDIRECT --to-port 3353
iptables -t nat -A PREROUTING -i ens3 -p tcp --dport 9090 -j REDIRECT --to-port 39090
iptables -t nat -A PREROUTING -i ens3 -p tcp --dport 25 -j REDIRECT --to-port 3325
iptables -t nat -A PREROUTING -i ens3 -p tcp --dport 80 -j REDIRECT --to-port 3380
iptables -t nat -A PREROUTING -i ens3 -p tcp --dport 587 -j REDIRECT --to-port 33587
iptables -t nat -A PREROUTING -i ens3 -p tcp --dport 465 -j REDIRECT --to-port 33465
iptables -t nat -A PREROUTING -i ens3 -p tcp --dport 9443 -j REDIRECT --to-port 39443
iptables -t nat -A PREROUTING -i ens3 -p tcp --dport 443 -j REDIRECT --to-port 33443
iptables-save
Collaborator as a service
In order to automatically start Collaborator whenever the VPS reboots or the service dies, you may want to setup it as a service.
Create a file called collaborator.service
sudo nano /etc/systemd/system/collaborator.serviceCopy the configuration below:
[Unit]
Description=Burp Collaborator Server Daemon
After=network.target

[Service]
Type=simple
User=collaborator
UMask=007
ExecStart=/usr/bin/java -Xms10m -Xmx200m -XX:GCTimeRatio=19 -jar /usr/local/collaborator/burpsuite_pro_1.7.33.jar --collaborator-server --collaborator-config=/usr/local/collaborator/collaborator.config
Restart=on-failure

# Configures the time to wait before service is stopped forcefully.
TimeoutStopSec=300

[Install]
WantedBy=multi-user.target
Enable the service:
systemctl enable collaboratorFinally, start the service:
systemctl start collaboratorConfigure Burp suite
Open your Burp Suite, go to “Project Options” > “Misc” tab, and configure the following settings:
- Server locattion: my-subdomain-for-burp.example.com
- Polling location (optional): my-subdomain-for-burp.example.com:9443
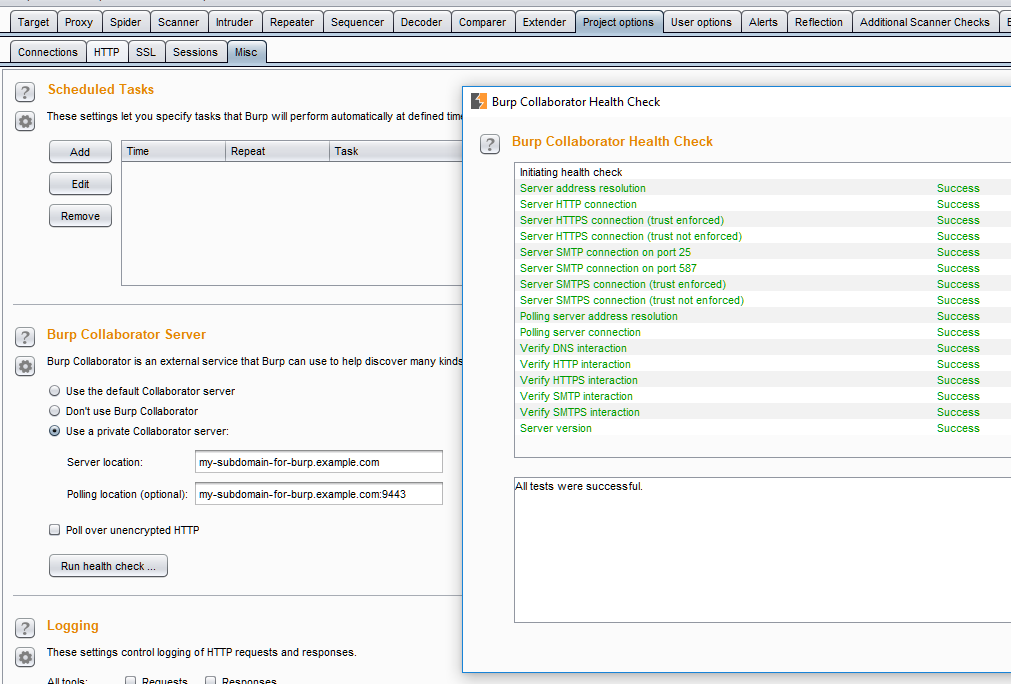
Setting up Burp Suite
Running Collaborator inside a Docker
TBC
Final note
If you got any errors during this process please feel free to send me an email to blog [at] fabiopires [dot] pt

[Update 10/04/2018]
- [Remove] Instructions to setup a DNS server as there’s no need to install bind9 on the VPS. Collaborator Server has its own DNS server built-in. (Thanks @morisson)
- [Add] Details to create the wildcard SSL certificate
- [Add] A script to “install” the certificates in the correct directory and setup the correct file permissions